Hi Simon
It should work fine with CMRx. Protocol is not important.
Posts made by ilyavialkov
-
RE: Is CMRx supported?posted in YCCaster
-
New pricing plansposted in YouCORS
We have recently updated our pricing plans. Each plan now includes a dedicated server.
- This removes restrictions on ьщгте зщште and client names, as there are no name conflicts.
- Allows us to show information about connections and events that have occurred on the caster, which helps customers track down errors on their own.
- Dedicated IP address allows the source table to show mount points only for a specific client.
- We also plan to allow customization of the caster.
In 2025 we plan to smoothly transfer all YouCORS users to dedicated servers. The fact that now servers are not shared among users forced us to reconsider prices. Soon we will update them on the landing page.
-
RE: Source table not being filledposted in YCCaster
@josep-bello Hi
Unfortunately no, If you are using http auth, you'll get NTRIP headers in the auth request and you can pass them back. But internally, yccaster will not set source. -
RE: Source table not being filledposted in YCCaster
@josep-bello Hi
Depending on the type of authorization, you can either- set source params in
mountpoints.yml - or return them in the http response
- set source params in
-
RE: Leica GS14posted in YouCORS
@francisco All of the same principles apply to your base. If your rover receives at this place a fixed solution from one base and does not receive from the other base, you need to find an issue with the second base.
-
RE: Leica GS14posted in YouCORS
Hi @francisco
I can give you only general recommendations:Insufficient Number of Satellites: A minimum number of satellites need to be visible to the receiver to calculate a fixed solution. If not enough satellites are visible, the receiver can only provide a float solution
Poor Satellite Geometry: The position of the satellites in relation to each other can affect the accuracy of the positioning solution.Poor geometry can prevent a fixed solution
Obstructions: Physical obstructions like buildings or trees can block the signal from satellites, making it difficult to maintain a fixed solution. It's important to have a clear view of the sky
Tropospheric Delay: The troposphere can cause delays in the GNSS signals, which varies with height above sea level, weather conditions, and satellite elevation angle. This can affect the accuracy of the RTK solution
Internet Quality: A poor Internet between the base station and the rover can prevent a fixed solution.A stable and fast connection is crucial for RTK corrections
To improve the chances of getting a fixed RTK solution, ensure the GNSS receiver has a good sky view, a stable internet connection for RTK corrections, and is not hindered by physical obstructions. If you're in an area with poor visibility, try obtaining a fix in a more open area first and then move slowly to the desired location
-
Planned Maintenance to YouCORS 08.06.2024 - 09.06.2024posted in YouCORS
A big update of the service is planned. The version of the operating system, database and all major applications will be updated.
The server on which the service operates will be moved from Europe to the USA.
The user interface will be updated.
The following features will be added:- Management of users and administrators
- Private casters and servers
We are sure to break something during such a big update. Therefore, the service team will work all weekend to fix all possible bugs and by Monday the service will be ready for normal operation.
If you have any questions, please contact support@hedgehack.com.
We apologize for any inconvenience,
Ilya -
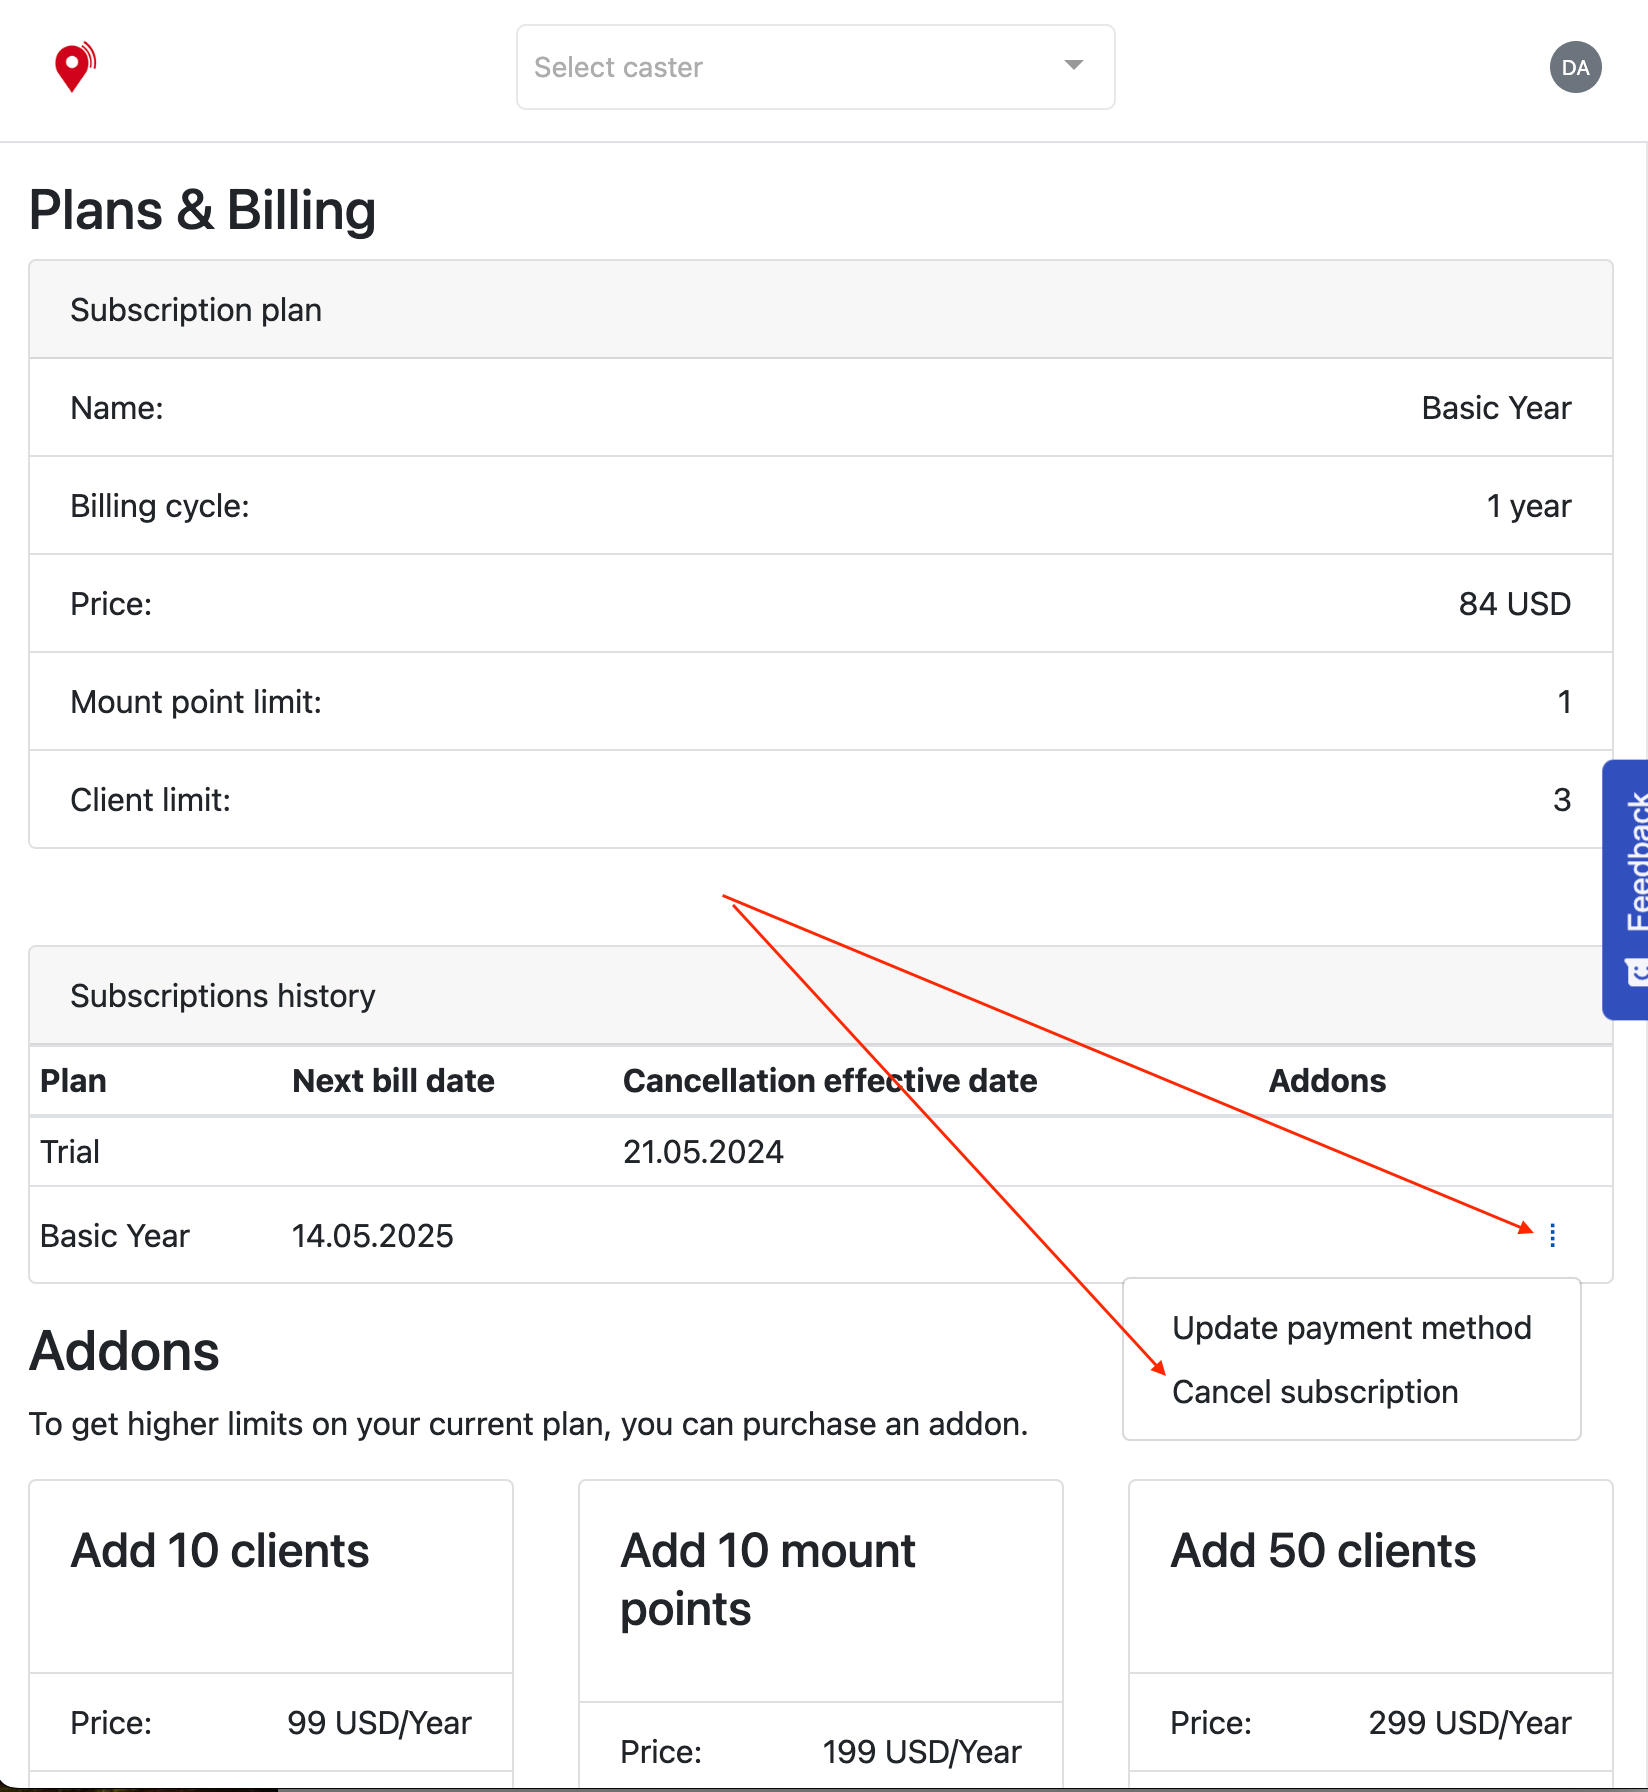
RE: Stop Youcors Subscriptionposted in YouCORS
@kalibaru-survey Hi
You can cancel your subscription on Plans & Billing page. Click details menu on current subscription item.
-
RE: API for clientposted in YCCaster
Hi @neshmi, thank you for your message.
Currently we do not store usernames or mount point names in caster. But each connection has a uniqueconnection_id. Thisconnection_idis present in all events and auth requests. So you can match events with a particular username by it. -
RE: linux ARM64 build of YCServer/YCCasterposted in YCCaster
@berkayoral It's probably possible, but we will need to update our build script. It seems too niche to invest time.
-
RE: iphone appposted in YouCORS
Hi @lodbrokjason
Not at the moment, we kinda soft launched the app for android. But then we get a bunch of ideas about team management. So now, we are working on API and web app, then updating app for android. and then ios app.Too many ideas to little menpower.
-
RE: forward serial rtcm3 to droneposted in YCCaster
@owsleyssalvation Yep, sometimes live is frustrating.
As I understand, you want to broadcast RTK corrections from you base to your drone. Please, describe your setup. Drone, base station, and so on -
Hedgehack products to do listposted in General Discussion
-
Mobile app for Android
product: YouCORS, status: in progress -
Accounts, User roles, User invitations
product: YouCORS, status: to do
When a user registers, they become the account owner. The owner can then invite other users to the account via email. A user can have different roles: Owner, Administrator, or User. The Owner can do everything. The Administrator can list, view, create, update, and delete resources such as mount points and clients. The User can only list and view resources. -
Mobile app for iPhone
product: YouCORS, status: to do -
Server addon, Private caster
product: YouCORS, status: to do
The account owner should be able to purchase a 'Server addon'. The addon will allow them to launch a dedicated server and create a Private caster. A Private caster will be visible only to the account members. -
Relay, Nearest base
product: YCCaster, status: to do
Relays will enable YCCaster to connect to other NTRIP casters as a NTRIP client and rebroadcast corrections. Implement relay endpoints in YCCaster API: list relays, start relay, stop relay.
When the nearest base setting is enabled, YCCaster should connect NTRIP clients to the nearest available mount point. -
Relay, Nearest base
product: YouCORS, status: to do
Allow account owners and admins to create relays. Add nearest base setting to caster instance configuration page.
-
-
RE: NEAR mode with Casterposted in YCCaster
@pierre-lauriente Hi Pierre, It's probably most requested feature, but it's not in a priority since we focus on mobile app and team members feature for YouCORS. Maybe in the beginning of 2024 we will back to YCCaster.
-
RE: the caster does not recognize your privposted in YCCaster
@ummagumma44 Hi
Please attach your clients.yml file, I'll check it -
RE: When trying to authorize http, the response is always "status_code":401,"status":"Unauthorized"posted in YCCaster
@dmytro-hryn said in When trying to authorize http, the response is always "status_code":401,"status":"Unauthorized":
auth:
- type: file
options:
mount-points: conf/mountpoints.yml
clients: conf/clients.yml - type: http
options:
url: http://127.0.0.1:8888/yc-caster-api/mountpoints/ntrip_auth
secret: super_secret
Remove file auth from config and keep only http.
- type: file
")